ubuntu中gnome-shell插件无法通过edge安装的解决

ubuntu中的gnome-shell插件无法使用edge安装, 进入插件页后会出现提示

Although GNOME Shell integration extension is running, native host connector is not detected. Refer documentation for instructions about installing connector

这是一个老问题了, 解决方案页非常简单 (来源https://askubuntu.com/a/1034692), 安装chrome-gnome-shell

sudo apt install chrome-gnome-shell
发表在 积少成多 | 留下评论

linux使用macos的键盘快捷键 (kinton在ubuntu24.04上的安装)

由于最近不停的在自己的macbook和linux台式机之间来回切换, 键盘快捷键的不统一让我非常难受, 经常ctrl-c cmd-c乱用. 在stackexchange上发现了一个解决方法比较简单(https://unix.stackexchange.com/a/714504), 使用kinto软件.

安装

安装和使用方法都可以从它的github上得到: https://github.com/rbreaves/kinto?tab=readme-ov-file#quick-install-method, 直接摘录下来

#install
/bin/bash -c "$(wget -qO- https://raw.githubusercontent.com/rbreaves/kinto/HEAD/install/linux.sh || curl -fsSL https://raw.githubusercontent.com/rbreaves/kinto/HEAD/install/linux.sh)"

#uninstall
/bin/bash <( wget -qO- https://raw.githubusercontent.com/rbreaves/kinto/HEAD/install/linux.sh || curl -fsSL https://raw.githubusercontent.com/rbreaves/kinto/HEAD/install/linux.sh ) -r

依赖库变化的修复

但是由于这个软件已经有一段时间没有维护了, 它依赖的xkeysnail版本更新改变了api,导致在ubuntu24.04上无法运行. 这个问题在kinto的issue上面有人反馈并给出了解决方法 (https://github.com/rbreaves/kinto/issues/902#issue-3207105991)

检查问题:

journalctl -f --unit=xkeysnail.service -b

输出结果中包含如下报错:

AttributeError: 'InputDevice' object has no attribute 'fn'. Did you mean: 'fd'?

解决方法, 修改/usr/local/lib/python3.12/dist-packages/xkeysnail/input.py文件. github的issue中给出了patch文件. 为了方便,这里负伤了修改后的input.py文件, 直接替换源文件即可. kinton_fix

激活使用

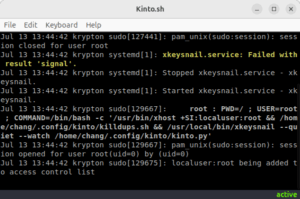
修复上述问题后, 软件就可以正常使用了, Kinto.sh窗口的右下角状态栏会出现绿色的active

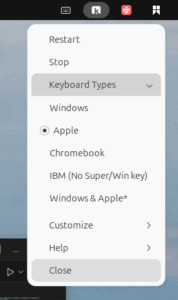
在system tray中的kinto图标中,可以激活macos的键盘模式(keyboard types – Apple)

不过我的常用快捷键中, 有一个收到了影响, 就是打开terminal的ctrl-alt-t的ctrl变成了cmd, 不过这个问题可以通过settings-keyboard-keyboard shortcuts中设置terminal的快捷键解决.

这样就可以在linux中使用macos的键盘快捷键了, 特别是可以在terminal中直接使用cmd-c和cmd-v来进行复制粘贴!

发表在 积少成多 | 留下评论

github ssh timeout问题解决

解决方案来源:https://bengsfort.github.io/articles/fixing-git-push-pull-timeout/
GitHub相关文档:https://docs.github.com/en/authentication/troubleshooting-ssh/using-ssh-over-the-https-port

有时候在clone或者pull GitHub上托管的repo时会出现无法连接的问题,直接报timeout错误。在这种情况下,https的clone还是可以用的,但是ssh的就不可以。根据GitHub文档解释,这可能是防火墙屏蔽了SSH到GitHub的链接。这种情况下推荐使用HTTPS端口访问ssh。

  • 问题判断:本文描述的问题会表现为github.com不可ssh连接,而ssh.github.com可以连接。可以通过一下命令检查是否时这个问题

    # 会timeout
    ssh -T -p 443 git@github.com\
    # 不会timeout,而是输出
    # Hi USERNAME! You've successfully authenticated, but GitHub does not
    # provide shell access.
    ssh -T -p 443 git@ssh.github.com
  • 解决方法:在.ssh/config中添加github的host设置

    Host github.com
    Hostname ssh.github.com
    Port 443
    User git
发表在 积少成多 | 留下评论

远程更新release遇到的一些问题和解决方法

今天终于把服务器从ubuntu22.04更新到了24.04. 远程更新系统总是让人心惊胆战, 不过好在这次更新还算有惊无险. 遇到了两个问题, 还是记录一下备用

问题1: 在安装了大部分更新后, 更新还是因为一些以来问题部分失败了. 重启后还是正常进入了24.04, 但是在使用apt install -f修复问题是, 出现了报错Temporary failure in name resolution. ask ubuntu 上的帖子将问题定位到了systemd-resolve. 在这次更新中的情况是, 这个软件包没有安装, 解决方法就是安装这个软件包

sudo  apt install systemd-resolved

万幸更新时已经下载了这个包的deb文件, 可以直接安装上.

问题2: worldpress无法访问了, 502错误. 根据stack overflow 的帖子, 这个问题是由于更新后php-fpm版本发生变化, 路径与ngnix的site configure文件不匹配导致的. 修复方法也很直接, 将/etc/nginx/sites-enabled/ 中的站点配置文件中关于php-fpm的行更新称正确的路径即可.

发表在 积少成多 | 留下评论

Performance model

Introduction

Without fast iteration cycles, the most prior thing we should be paying attention to, in the field of adapting scientific algorithms to high performance computing devices with parallel, shared memory, multi-core systems, is setting up an empirical model that predicts the performance given specific hardware architecture and algorithms.

In this blog-like article, I intend to summarize all required knowledge from a thesis(Anthony Joseph, 2009) to build performance models step by step.

Background knowledge

This section intends to fill the knowledge gas for those who are not familiar with the technical details of hardwares. For those who are already experts in the field, they can skip this section and move onto the next.

One should consult Hennessy and Patterson’s texts (computer organization and design) for details.

Microprocessor

A microprocessor has a Central Processing Unit (CPU) on an integrated circuit. The CPU operates on instructions defined by an Instruction Set Architecture (ISA), for example, x86/ARM/RISC-V. The process can be summarized in a loop, in which both instructions and data undergo:

  1. fetch: instructions are fetched from the main memory
  2. decode: instructions are decoded and required data are fetched
  3. execution: CPU executes the instruction and the instruction is retired
  4. write back: result of the operation from the execution is stored back
  • The von Neumann architecture means that both data and instructions are stored in main memory. The main memory is separated from the CPU so that data needs to be explicitly moved from main memory into the on-chip registers.

The explicitly required movement of data is normally the rate determining step, i.e. the performance largely depends on how fast we can move the data. To solve this problem to some extent, computer scientists proposed to use cache memory sit in between CPU and the main memory.

In its essence, the usage of cache memory brings locality. There are two types of locality: space locality and time locality. Space locality means that required data are stored in chunk, so we need fewer memory operations. Temporal locality means that the data/instruction can stay in the cache for a long time.

Parallelism

  • Data level parallelism (DLP): A form of parallelism with a sign of a single operation manipulating a set of data. An example is Single Instruction Multiple Data (SIMD)
  • Instruction level parallelism (ILP): This form of parallelism intends to maximize the utilization of hardware resources by increasing number of instruction being executed at any given time. Instructions are retired ‘in-order’ or ‘out-of-order’ to maximize ILP.
    • Super scalar execution
    • Instruction pipelining
    • Out-of-order execution
    • Branch prediction and Speculative execution
发表在 积少成多 | 留下评论

ubuntu24.04中安装Molden

Molden是电子结构计算前后处理的优秀软件,而且开源免费。但是似乎在ubuntu上面编译它并不是非常直接。本文主要参考Reddit 上的一个解决方法,针对我目前用的系统给出编译和安装流程

  1. 根据Molden文档安装依赖库

    sudo apt-get install gfortran
    sudo apt-get install libgl1-mesa-dev
    sudo apt-get install build-essential
    sudo apt-get install mesa-common-dev
    sudo apt-get install libglu1-mesa-dev
    sudo apt-get install libxmu-dev
    sudo apt-get install xutils-dev
    sudo apt-get install wget

    在我的系统中,libX11-6libX11-devlibgl1-mesa-glx无法安装,但似乎没有影响后续编译。

  2. Molden官网下载源文件并解压,目前最新版为molden7.3

    wget https://ftp.science.ru.nl/Molden/molden7.3.tar.gz
    tar xvf molden7.3.tar.gz
    cd molden7.3
  3. 修改makefile以便适应新的gfortran编译器
    根据Reddit教程的解释, 在gfortran 10版本之后, argument miss match会从warning变为error, 从而导致无法正常编译. 因此, 需要在编译时添加flag -w -fallow-argument-mismatch 来避免编译报错. 具体操作为: 将makefile, src/ambfor/makefile以及docker/makefile 三个文件中的所有FFLAGS 都加上上述flag (与原帖不同, docker/makefile文件也需要修改)

    与原教程不同的是, 我还 注释掉了makefileall tag中的$(EXTEN), 根据个人理解, 这部分应该属于install步骤而不是编译环节

  4. make

    make

    make后, 可执行文件全部包含在了bin文件夹中, 这时候编译工作就完成了.

  5. (可选) 进一步修改makefileutils中的文件以便正确安装
    首先, install tag中直接将安装目录设置为了/usr/loc/bin, 如果需要安装到本地目录, 如需更换, 可以更改. 同时需要联动更改的还有extent2标签中的/usr/local/bin文件夹的位置. 同时, 应该删除install中的sudo 以提升安全性
    然后修改utils/register_extension.sh, 将DIR的赋值改为DIR=$1来正确读取脚本的argument. 同时注释掉最后的sudo cp ~/.local/share/applications/$APP.desktop /usr/share/app-install/desktop/$APP:$APP.desktop
    最后make install进行安装.

可以直接下载修改后的molden文件, 并更改makefile中的PREFIX来修改安装目录, 方便安装.

发表在 积少成多 | 留下评论

ubuntu中fcitx5中文输入无法在edge和chrome中使用

解决方案来源:https://github.com/fcitx/fcitx5/issues/384#issuecomment-1532428129

问题描述:
ubuntu安装fcitx5-pinyin后,可以在terminal等应用中使用,但是无法在edge浏览器等其他应用中激活输入法

解决方法
编辑文件~/.config/environment.d/profile.conf,添加输入法相关设置

GTK_IM_MODULE=fcitx
QT_IM_MODULE=fcitx
XMODIFIERS="@im=fcitx"
发表在 积少成多 | 留下评论

在开启secure boot的ubuntu上安装virtualbox

在开启了secure boot的ubuntu电脑上安装virtualbox无法直接使用,原因是virtualbox新安装的module需要签名才能加载。否则会报错

Kernel driver not installed (rc=-1908)

ask ubuntu的帖子给出的方法可以解决这个问题,具体方法摘录如下

  1. 对文件签名并生成新的kernel
    #生成MOK.der和MOK.priv文件
    sudo /sbin/vboxconfig 
    #安装签名工具
    sudo apt-get install mokutil
    #生成签名文件
    openssl req -new -x509 -newkey rsa:2048 -keyout MOK.priv -outform DER -out MOK.der -nodes -days 36500 -subj "/CN=VirtualBox/"
    # 将签名文件添加到kernel
    sudo /usr/src/linux-headers-$(uname -r)/scripts/sign-file sha256 ./MOK.priv ./MOK.der $(modinfo -n vboxdrv)
    # 将新的kernel注册到secure boot
    sudo mokutil --import MOK.der

    在上述步骤的最后一步需要设定一个密码,需要记住这个密码(重启电脑后要用)

重启电脑,会进入Perform MOK mangement为标题的蓝色界面 -> 选择Enroll MOK,一路继续到输入刚刚设定的密码 -> 重启电脑。

再次重启电脑后,virtual box就应该可以使用了.

By the way, put virtual machines on SSD will provide much better performance than on HDD.

发表在 积少成多 | 留下评论

apt使用系统代理

使用ubuntu的一些第三方源的时候apt update有可能遇到Could not connect to 错误,如果这是因为apt没有使用系统代理,则可以用如下解决方法

sudovi

在打开的文本编辑器中添加设置条目

Defaults env_keep = "http_proxy https_proxy ftp_proxy DISPLAY XAUTHORITY"

reference:

发表在 积少成多 | 留下评论

把主机作为git服务器

把主机当做git服务器使用非常容易

  1. remote主机创建git服务的用户,这里假设叫gituser
    sudo useradd -m gituser
  2. remote主机设置ssh公钥
    su gituser
    cd ~
    mkdir .ssh
    vim .ssh/authorized_keys # 复制公钥内容
    chmod 700 .ssh
    chmod 600 .ssh/authorized_keys
  3. remote主机初始化空想要同步的repo(使用--bare flag)
    mkdir -p ~/path_to/some_test_repo.git
    cd ~/path_to/some_test_repo.git
    git init --bare
  4. 本地电脑添加remote信息并push
    cd some_local/repo_path
    git remote add origin gituser@remote-server-url:/path_to/some_test_repo.git
    git push

参考材料:

发表在 积少成多 | 留下评论

获取python module的路径

每个module都会有__file__属性记录它的路径,以numpy为例

import numpy as np
import os
path = os.path.abspath(np.__file__)

Reference:
https://stackoverflow.com/questions/247770/how-to-retrieve-a-modules-path

发表在 积少成多 | 留下评论

MPI跨节点跑多GPU任务

需要确保资源正确分配,mpirun可以用如下命令,$ngpu$ 是跨节点的总GPU数,$ngpu_per_node是每个节点的GPU数量

mpirun -np $ngpu -npernode $ngpu_per_node \
    --map-by slot:pe=1 \
    --rank-by slot \
    --bind-to core \
    --report-bindings \
    <commond to run>

作业脚本为了跨节点GPU申请也需要使用额外的设置,这里以slurm为例,应该写成

#!/bin/bash
#SBATCH -N 4 # 节点数
#SBATCH --gres=gpu:8 # 每个节点的GPU个数,对应$ngpu_per_nod
#SBATCH --qos=<gpu资源名称> # 这部分需要参考服务器的说明
发表在 积少成多 | 留下评论

[Linux]指定程序运行的cpu id

在HPC上跑计算时,有时需要指定程序运行的CPU id以便获得更好的性能,下列linux命令可以达到这个目的:

taskset -c 0-5 <command> [arguments for command]

Reference:https://unix.stackexchange.com/a/635992

发表在 积少成多 | [Linux]指定程序运行的cpu id已关闭评论

macOS Quantum espresso编译hdf5支持

使用macports直接编译QE,会找不到macports的hdf5库,尝试各种flag设置无果后,改用手工编译HDF5解决

编译安装hdf5

./configure --prefix=$HOME/opt/hdf5 --enable-fortran --enable-parallel  --enable-hl 
make && make install

注意configure时需要添加fortran支持等flag

编译安装QE

configure

F90=gfortran CC=gcc \
BLAS_LIBS="-L/opt/local/lib -lopenblas" \
LAPACK_LIBS="-L/opt/local/lib -lopenblas" \
./configure --enable-openmp --disable-parallel --enable-debug \
            --with-hdf5=$HOME/opt/hdf5

删除不支持的编译flag

生成的makefile会包含一个不支持的flag,-lrt,需要从make.inc中删除

make and test

make pw # only pw.x and related modules
cd test-suite
make run-tests-pw
发表在 笔记 | 留下评论